Learning how to make seed tape for small seeds can be a great project for the kids, but it’s a rewarding endeavor for the grown-ups, as well. Plus, it’ll save you money if you typically purchase store-bought seed tape.
My first time making seed tape was prompted by my desire to get my son, Isaac, then eight years old, out in our garden helping to plant vegetables. I had initially recruited him to help with starting some seedlings indoors, but he was frustrated with some of the smaller seeds. When I learned we could make our own seed tapes at home, I knew it would be the perfect way to deal tiny seeds like those for carrots and lettuce.
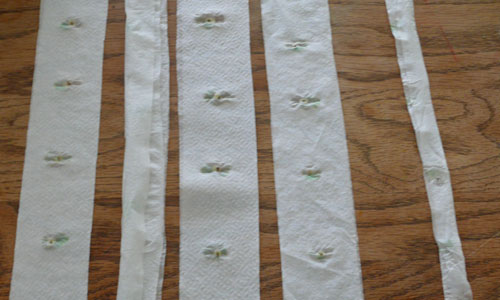
There are several ways for how to make seed tape, but we found it easiest to just use toilet paper and seeds and a spray bottle to get it all to hold together until it dried.
How to make seed tape:
- From a roll of toilet paper (ideally the thinner type like Scott brand), unroll a decent length for your seed tape. You probably don’t want to get too long, because it will get difficult to manage.
- Cut (or tear) into shorter sections no longer than the length of your table. Unless you plan to plant the seed tape right away, you’ll want to leave the seed tapes to dry completely before carrying them out to the garden.
- If it helps, with a pen or marker, mark the strips at the recommended spacing intervals. For example, it’s recommended that carrots are planted at least 2″ apart. Initially, we made marks every two inches down the length of our strips. After the first couple of strips, we were able to just eyeball it.
- Crease the strips of paper towels the long way before placing the seeds — either in half, or in thirds. It will be hard to fold once it’s wet.
- Give the strips a misting of water to help the seeds ‘stick’ in place.
- Place the seeds on the marks — carefully — and then fold the ends of the strips over (at each of the long ends) and then fold them back together lengthwise, or in thirds, if you prefer.
- Give the entire strip a light misting of water and gently press down the whole length of the strip so that when it dries, the folded sides will be stuck together.
- Wait about an hour or so for the strips to dry, then roll up your seed tapes. They’re ready to be planted!
Planting seed tape
Make very shallow furrows in your soil, unroll the seed tape. Cover with a thin layer of soil.
Wait for them to grow! That’s it! 🙂
⚠️IMPORTANT: Don’t bury your seed tape too deep. Carrot seeds, for example, only need to be buried about 1/4 to 1/2″ deep at MOST.
Tip for homeschoolers
If you decide to tackle this project with your child it can be a great learning opportunity. Here are some of the science and horticulture concepts that you can talk about while making your seed tapes:
- What does biodegradable mean?
- What does soluble mean?
- Why is spacing important for our plants?
- What happens if we don’t give enough space to our plants?
- Bonus: Research what happens when you transplant root crops and why it’s probably not a good idea.
Seed tape would be great to use when you’re planting your survival garden. Click here to learn how.


